Expression Tree Visualizer for Visual Studio 2013
If you start digging into Linq and Expression Trees then to make your life easier you should use ExpressionTreeVisualizer tool. First it was released as part of samples to Visual Studio 2008. Lucky there is upgraded version of it available on github with works with Visual Studio 2013. You can reach it under below link: https://github.com/Feddas/ExpressionTreeVisualizer
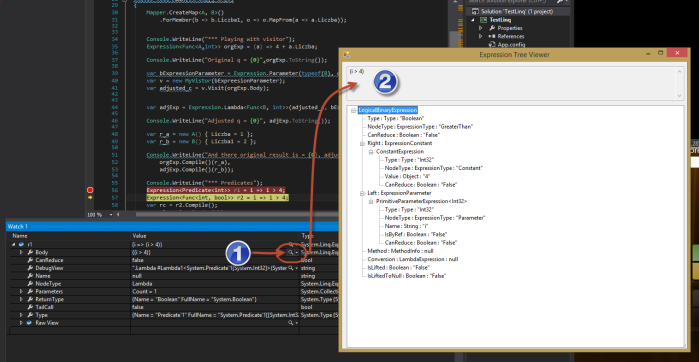
Once you get it to your station, then grab “ExpressionTreeVisualizer.dll” and place it under the folder “C:\Program Files (x86)\Microsoft Visual Studio 12.0\Common7\Packages\Debugger\Visualizers”. Next restart your visual studio and if you start debugging your app you should get:
Now you can analyze your expression tool in more easy way.
Injection in Jasmine with anuglar-mock.js
So, you’ve build your angular app service and now you would like to test it. Testing simple service without dependencies is not big deal, but when it goes to test services with have some dependencies then it is quite easy to get lost.
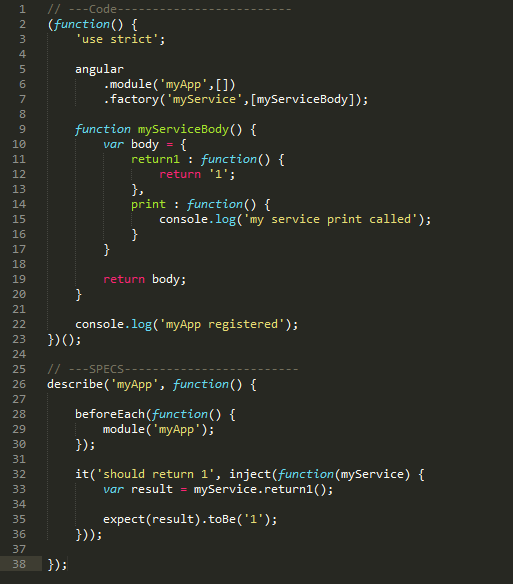
Let’s start with basic example, where our service is not depended on others:
http://jsfiddle.net/MariuszGorzoch/81o74pwq/2/
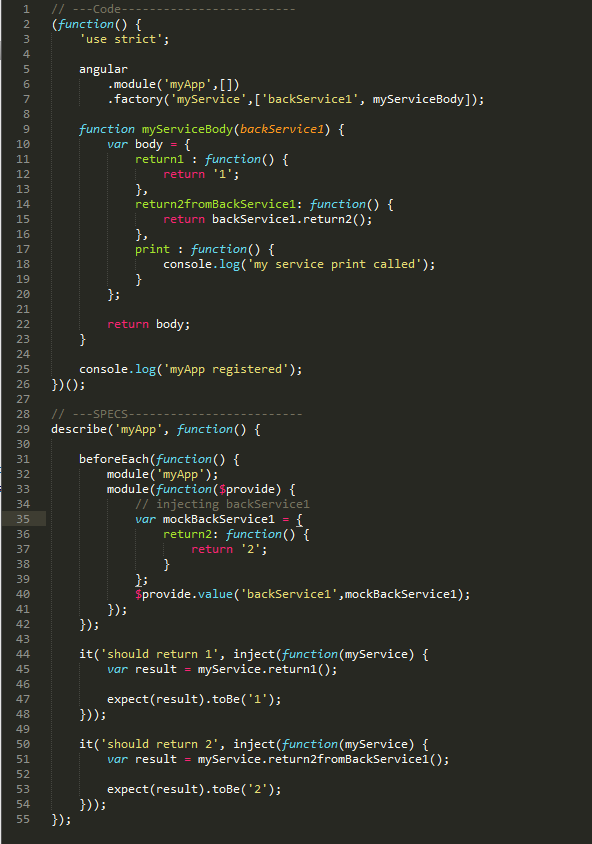
above service didn’t have any dependencies, so let’s upgrade it:
http://jsfiddle.net/MariuszGorzoch/81o74pwq/5/
as you can see above in order to inject dependency in our service we need to use $provide.value(‘{serviceWithAreTryingToMock}’, {MockImplementation}); Thanks to that we can mock whatever service we want.
C# extensions method by JavaScript
Not so many people are aware that extensions method are possible to implemented also on JavaScript code. Here you have quick example how to achieve that:
1. Let’s create class definition
 function MyClass(imput){
 this.myProperty = input;
 }
2. Let’s create object of our class
var myObject = new MyClass('test');
3. Now, we are ready to add first extension method to our MyClass definition
 MyClass.prototype.PrintMe = function() { console.log(this.myProperty); }
 myObject.PrintMe() //Prints "test"
4. That was easy, but we can go even further and add additional method to all existing objects, by simply extending “Object” class
 Object.prototype.PrintMeSuper = function() { console.log("super print!"); }
myObject.PrintMeSuper(); //Print "super print!"
JavaScript can be fun, 😉
Chrome Omnibox -> how to show URL
In recent release of chrome Google introduce hiding of URL from OmniBox (URL address bar).
If you annoyed by this like me then there is simple solution for that. Simply go to that page:
chrome://flags/#origin-chip-in-omnibox
and disable it.
More details can be found under fallowing post from Google forum
React.js
React.js is a Facebook client-side engine to build custom components for your web site application. It is meant to be a declarative framework, so it focuses on transforming data into interface components.
React’s top features:
- speed
- declarative binding
- composability.
Hello World
When working with new framework, then there is no better way to start then by trying simple hello world example. Before start please ensure that you reference react library inside your HTML page (you can download it from the project site or directly link that url: http://fb.me/react-0.11.1.js)
1: /** @jsx React.DOM */
2: var Hello = React.createClass({
3: render: function() {
4: return <div>Hello <b>{this.props.name}</b></div>;
5: }
6: });
7: React.renderComponent(<Hello name=”World” />, document.body);
line 1: this tells the browser that we will use jsx features
line 2: we declare our react component
line 3: minimum requirements for new react component is to implement “render” function
line 4: jsx statment. It get compiled before run time.
line 7: call react engine to render “Hello” component into DOM element pointed by second argument.
Rendering a component means linking it to a DOM element and populating that DOM element. Current content of the DOM element get replaced.
Components can inherit other components.
Below you can see our above example modified to explain that scenario:
1 : /** @jsx React.DOM */
2 : var Inner = React.createClass({
3 : render : function() {
4 : return <div>Message from inner commponent</div>
5 : }
6 : });
7 : var Hello = React.createClass({
8 : render: function() {
9 : return <div>Hello <b>{this.props.name}</b><br/><Inner/></div>;
10: }
11: });
12: React.renderComponent(<Hello name=”World” />, document.body);
Output:
Hello World
Message from inner commponent
Working with arrays.
Below you can find simple example how to use “map” function, with quite usefully when it comes to nesting components:
1 : /** @jsx React.DOM */
2 : var Post = React.createClass({
3 : render : function() {
4 : return <p><i>{this.props.post}</i></p>
5 : }
6 : });
7 : var Blog = React.createClass({
8 : render: function() {
9 : return <div>
10: Blog name = <b>{this.props.name}</b><br/>
11: {this.props.posts.map(function(p) {
12: return <Post post={p}/>
13: })}
14: </div>;
15: }
16: });
17: React.renderComponent(<Blog name=”Gorgo.Live.ToString()” posts={[‘post1-1’, ‘post1-2’, ‘post1-3’]} />, document.body);
In response we get:
Blog name = Gorgo.Live.ToString()
post1-1
post1-2
post1-3
State
Each component can have his own state. Once state of component change then it generated DOM is updated by regenerating it again.
Here is simple example of it usage:
1 : /** @jsx React.DOM */
2 : var Counter = React.createClass({
3 : getInitialState: function () {
4 : var state = {c : 1};
5 : setInterval(function() {
6 : this.setState({c : this.state.c +1});
7 : }.bind(this),1000);
8 : return state;
9 : },
10: render: function() {
11: return <div>Counter = {this.state.c}</div>;
12: }
13: });
14: React.renderComponent(<Counter/>, document.body);
That give us output as below:
Counter = 1
and that is updated every 1 second.
Above are the basics of React.js, but I believe it is good start or at least it can speed you up if you would like to try it quickly in your project.
More about React.js can be found on their offical web site: http://facebook.github.io/react . I’ve also recomend good course on Pluralsight : React-fundamentals
Code review lesson learned
So, you’ve been coding for a while and now someone ask you to review his code. In that post I would like to share few tips what I believe the code review is about. Let’s get started:
- Code review is about small incremental improvements
When doing code review we should not perform detail analyze of everything we got, but instead we should focus on one area (200-400 lines) and just post 1, max 2 improvements to the existing code. The idea is to improve someone else code by small incremental steps. Better to focus on one think, discuss that and workout the best approach then spend a lot of time verifying entire change and trying to discuss number of improvements. Code review should be done ideally before each check-in of the code and shouldn’t be time consuming. The power of it lays in repeating that process over and over again and improving our coding standards slowly. - This is not about blaming, showing you are better
Code review process is about improvement and learning from each other. What team has to heavily avoid is trying to show up, point someone else mistakes or use it as kind of verification process how good developers are. If you go that path then you can be sure that this is the shortest way to kill all goodness around code review process. - It is not only about skills
Some people tend to assign only skilled developers to do code review and do not let all junior developers to be a reviewer. I would say this is really bad practice. Code review should be done by all team members and I believe that junior developers can also bring a lot of good ideas. Junior developers do not have years of practice of coding and by this they can find bright and simple solution to complex problems and by this simplify our code. - What about communication
Doing code reviews I found that it also improve communication as it give opportunities for team members to discuss different approaches they use to solve problems. On the daily bases developers tend to stick to their computers and do not talk too much. They rather get assigned to tasks and once they figure out how they want to code it then they start and do the typing part. Code review process force them to start talking with other team members about how they solve particular problems and why they did that this way. That is a great opportunity to improve communication in the team and that in my opinion is one of the critical factors in successful projects. - Share and promote good solution
When reviewing someone code we often find brilliant solution and I believe we shouldn’t just go by, but instead we should let the author know about that or even share this with rest of the team. We all want to be seen and shy – let’s promote that and the good will come back to us at some point too. That improve team morale and make us all eager to improve even more. - Meet from time to time and sum-up all findings
When doing that ensure that things you will discuss will not be personal and will not insult any particular team member. Remember code review is about improving and not blaming. There is thin line between two and you don’t want to cross it. What to pick-up for those meetings : best things are common mistakes share by all team members or you can just have a discussion how to improve your code readability. Make a note from that meeting, share with everyone and this could be a good starting point for your next review. - Simplicity is the key
Often people ask me : how should I decide if something is a good solution to a problem or not. My answer is : maintenance/simplicity. The solution you are building is going to last for a while and for sure you as a team will have to maintain it for a while. In that case good readability and simplicity are key factors to ensure you have easily maintainable code. So, next time you are not sure then ask yourself a question: will I understand that code 6 months from now ? - Never go too emotional
Never become to emotional about the code you are reviewing. Everyone of us make mistakes or have bad practices. That is something we get as humans by default. When looking at someone code we should focus on how we can help that particular person to be better, to improve. If we switch to blame mode, then you can be sure that author of the code will go deference and will not take any lesson from you. This will make your time wasted and come on = we have just one life to live - Don’t focus on how you will design it
You need to keep in mind that you are reviewer of the code and not someone who solve that problem from the scratches. That in particular is really hard to learn. Focus on design of the code, not particular solution and the way you will do it.
Those above points in my believe are key factors to ensure that code review process can work for you and your team. If you find some time then I strongly recommend to watch “Lessons from Real World .NET Code Reviews” course done by @Shawn Wildermuth on @Pluralsight.
Metro UI Multibinding
Recently I came to a problem when I had to pass more then one parameter to the command (textbox control and two string configuration values). That can be achieve in WPF quite easily thru “MultiBinding” (more about that can be found under below URL: http://stackoverflow.com/questions/1350598/passing-two-command-parameters-using-a-wpf-binding). Unfortunately that approach is not available in Metro.
As I need that quite much, then I start trying with different options and found below one working quite fine. The idea is to use “Converter” and “ConverterParameter” attribute and pass thru it additional parameters in form of a string. Doing that and merging those two string parameters with original parameter pass thru CommandParameter into one array I manage to pack all parameters and pass them to OnExecute method of the command.
Below you can find example of button declaration with use that approach:
<Button Command="{Binding ShowWindow}"
CommandParameter="{Binding ElementName=TextControl01,
Converter={StaticResource InjectParametersConverter},
ConverterParameter=’Param1Value|Param2Value’}"
Content="Show phrases"></Button>
<TextBox x:Name="TextControl01"/>
To make above work we need converter “InjectParametersConverter”:
public class InjectDefintion
{
public TextBox TextControl { get; set; }
public string Parameter1 { get; set; }
public string Parameter2 { get; set; }
}
public class InjectParametersConverter : IValueConverter
{
public object Convert(object value, Type targetType, object parameter, string language)
{
var parameters = ((string) parameter).Split(‘|’);
return new InjectDefintion()
{
TextControl = (TextBox) value,
Parameter1 = parameters[0],
Parameter2 = parameters[1]
};
}
}
and then in the OnExecute for command “ShowWindow” use paramters “InjectDefinition” to extract all parameters:
public RelayCommand<InjectDefintion> ShowWindow { get; private set; }
private void OnShowWindow(InjectDefintion paraemters)
{
TextControl = (TextBox) value,
Parameter1 = parameters[0],
Parameter2 = parameters[1]
}
that should give you option to pass additional parameters.
Resources found for language(s) ‘en-us’ but no resources found for default language
If you encounter above problem then :
assuming your default language is “no”
By default language I understand that “Package.appxmanifest” says that your application “Default language” is “no” as also when you edit definition of your project “.csproj” file then it contain “no” inside “DefaultLangage” node (=for all projects in your solution). Please notice especially content of “.csproj” file <- it is set during creation of the project and you have no way of changing that from visual studio
in order to get rid of that problem you need to:
1. if you have “strings” folder (default location of all text resources) then inside you have to have subfolder “no”
2. if you have “images folder (default location of all images) then inside you have to have subfolder “no”
if you don’t have one of above then you will get warning as above.
530 User cannot log in, home directory inaccessible
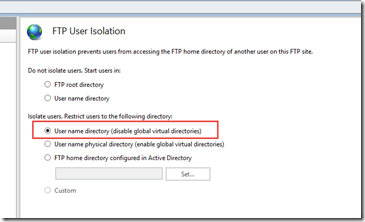
I’ve was setting up today standard FTP (the one with comes with the installation) server on Windows 2012 R2 and after setting up the users and ensuring that we keep them isolated :
we started to get error message as stated in the title of this post.
Home directory of my FTP was = “c:\ftp”
Name of the user “MyUser”
Based on the documentation above setting should try to establish home directory for the user under : “c\ftp\MyUser”. Unfortunately apparently there was something wrong here.
I’ve dig for a while and finally started “ProcessMonitor”. What he show’s me that actually FTP service is looking for home directory under location “c:\ftp\LocalUser\MyUser”. After moving my user folder under “LocalUser” I was able to login without any problems.
HRESULT E_FAIL has been returned from a call to a COM component–continued
It did happened again. Today I got again error “Error HRESULT E_FAIL has been returned from a call to a COM component”. This time I’ve decided to use FileMon (http://technet.microsoft.com/en-us/sysinternals/bb896645) and see if he is not pointing to something with my app doesn’t have access to. What pop-up from that tool is that the app was trying to access that folder :
C:\ProgramData\Microsoft Team Foundation\4.0\Cache
and it end-up with “Access denied”.
I’ve added account used to run app pool to above folder with full permission. Restarted app pool/app and when it went up my error disappeared.
So it, looks that this was permission problem.


